


.png?v=20250418 "WPC/SPC/LVT / Flooring Molding / Moulding / Trims / Stair Tread")


News & Events
Floor Accessory--Molding
Besides the floor, there are also many other things that can be important to your home decoration plan, like wainscot, furniture, curtain... But one thing closed connected with the floor is the Floor Accessory. They come in different shapes and names. Just look at the passage and you will know more about them.
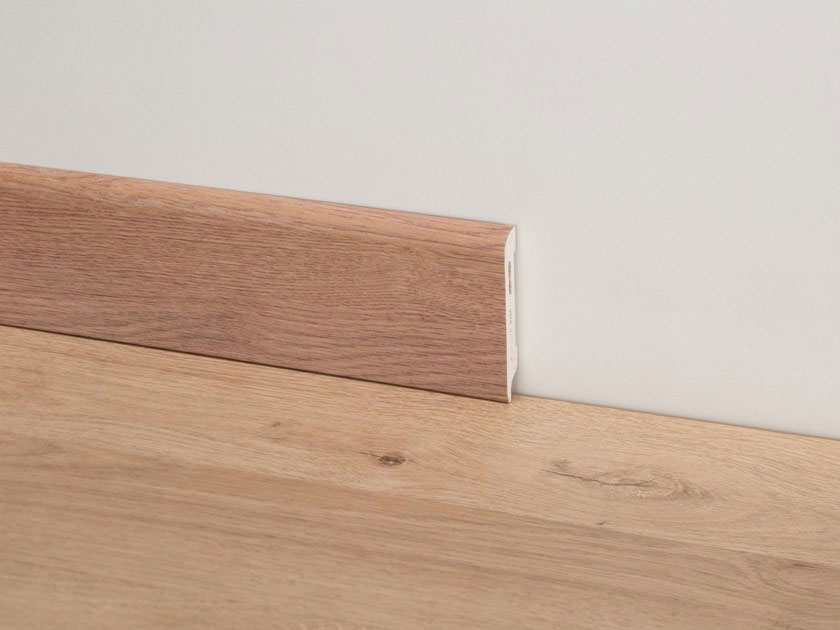
Skirting Molding for Floor Wall Transitions
One of the traditional moldings used to cover expansion gaps is skirting or commonly called baseboard. Skirting’s heights differ from manufacturer to manufacturer but typically can range anywhere from 2 inch to 5 inch tall. Skirting can be plain and generic or very decorative and, like the Quarter Round, homeowners usually prefer these moldings to be painted or stained the same color as the floor and the rest of the trim in the room.
Skirtings are fastened to the wall by using tiny nails, nailing approximately every 16 inch and to make sure it won’t look bad because of the little holes, you can put some putty with similar color on it.
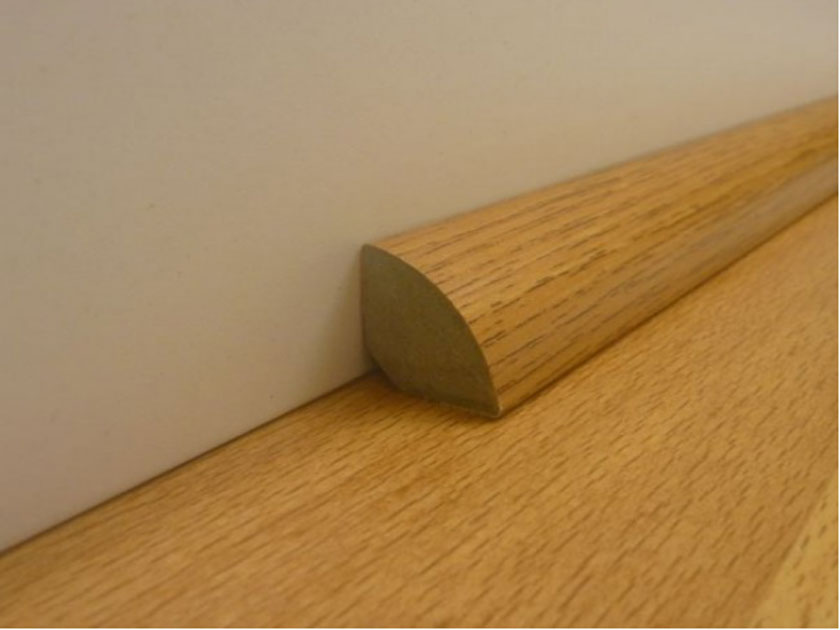
Quarter Round Molding for Floor Wall Transitions
One of the most common types of molding is called the Quarter Round, also known as Base Shoe. Quarter Rounds are typically 3/4 x 3/4 inch and are used to cover the necessary expansion gap between a hard surface floor and a wall. In a way, it can achieve the same function with the Skirting with lower cost. It’s also can be used along with the skirting in installation. Manufacturers offer Quarter Round to match (as close as possible) the color of their specific floor.
Installation of Quarter Round is very simple and is something anyone can do. Simply nail the Quarter Round into the baseboard or the wall using 6 penny finish nails approximately every 10 inch. When preparing a room for a new installation, it is necessary to remove existing Quarter Round prior to installing the new flooring. Or you can just glue it against the wall, but in the long term it will detach.
T-Molding for Floor Transitions
T-Moldings are appropriately named as the profile resembles a capital T. The T-Molding is used in situations where you're transitioning from one hard surface to another with the same height. The top part of the T-Molding overlaps both hard surfaces. It's of ultimate importance that these two hard surfaces are of the same height, as, if one side doesn't have the appropriate support, that side of the molding will crack once it's being stepped on. The same reason goes for why the T-Molding can not be used to transition to soft surface like carpet. There's just not enough support.
To install a T-Molding, a space needs to be left between the two hard surfaces. The transition piece is then glued down where it meets the subfloor using construction adhesive. It's recommended to place a heavy object on the newly glued T-Molding overnight, in order to ensure a tight bond. In addition to being glued down, you can also choose to face nail the T-Molding (in the middle of the T-Molding) to the subfloor using 8 penny finish nails.
There is also another installation method: a space needs to be left between the two hard surfaces. This transition design relies on a metal track that is nailed or screwed to the floor between the two hard surfaces. The T-molding is then snapped into place. This method is glueless and makes installing a floating floor quicker since there is no glue drying time.
End Cap Molding For Wood Floor Transitions
Square Nose Reducers are very similar to Thresholds but have a more squared off edge. Typically used with floating floor, a Square Nose is perfect for butting hard surface floors up against vertical obstacles, where a Quarter Round or Wall Base would be difficult to use to cover an expansion gap like a brick wall, fireplace, sliding glass door, entryway doors. The Square Nose Reducer overlaps the hardwood or laminate floor, hiding the expansion gap with the overlapped portion of the molding.
Installation of a Square Nose Reducer would involve using construction adhesive to glue the transition piece to the subfloor and/or face nailing the piece to the subfloor using 8 penny finish nails.
Consult the manufacturer's installation instructions for the best results.

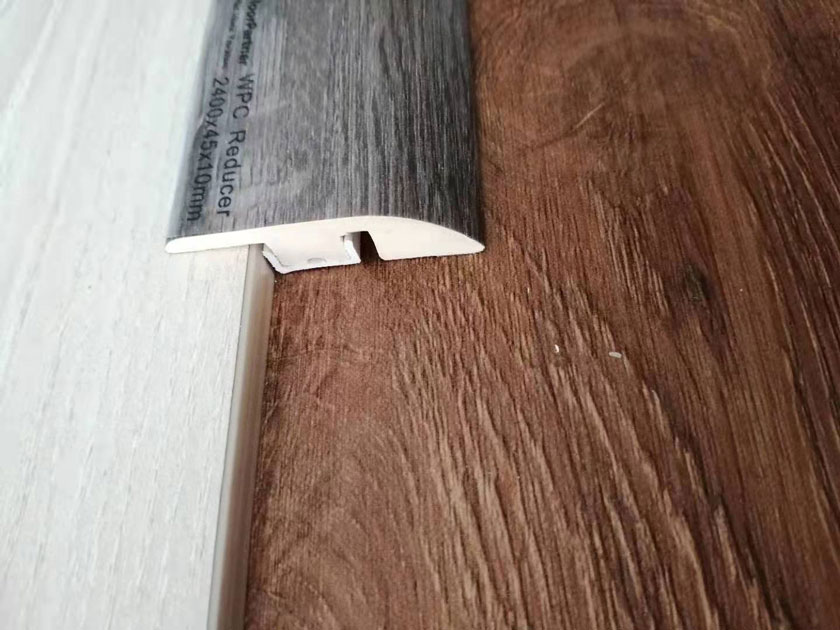
Reducer Molding for Floor Transitions
While installing a floating floor, it's especially important to leave expansion gaps where the new flooring meets up with walls or with a second floor. Overlap Reducers were created for the purpose of transitioning smoothly from this floating floor to a second floor like vinyl, tile or low pile carpet. Much like a Flush Reducer, an Overlap Reducer gradually slopes down to meet the second floor, but instead of locking in flush with the hardwood, an Overlap Reducer has a small protruding piece which will overlap the floating hardwood or laminate flooring. The purpose of this overlap portion of the transition piece is to hide the expansion gap left, allowing the floating floor to move without restriction.
Flush Stair Nose Molding for Floors
With flush stair nose molding the tongue and groove configuration is used to secure the nose to the floor overlay and the stair underlayment. This offers a smooth surface transition between the stair nose and the floor. In ideal situations the wood color is identical for a appealing look and feel. It is dependent on the manufacturer to provide proper complementary stair nose molding. If customized flush molding cannot be found then the installation might need to use overlap molding described below.
Expansion gap considerations are less important for stair tread placement because the amount of material is small and the expansion slight. Still a mall gap should be allowed where the tread meets the riser. This gap would then be covered by the riser overlay. Overlap stair nose molding can be used in combination with flush molding to accommodate transaction at the top of the stairs, where it would be transitioning from a differing floating floor down to the first step.
Flush stair nose pieces are installed by construction adhesive the flush stair nose to the subfloor using. In addition, using two 8 penny face nails, nail down the flush stair nose approximately 3 inches. in from each end as well as in the center of the flush stair nose piece. If the stairs are extra long, make sure to face nail two 8 penny finish nails at approximately every 20 inches of the molding.
Stair Treads For Stairs
If you want a fast and easy option for tackling your stairs project, consider Stair Treads. A Stair Tread is a whole piece of finished stair which you simply glue and nail down and then you're done. Stair Treads negate the need for Stair Nose pieces and individual floor boards, saving a lot of installation time. Also available, are Stair Risers, which are the vertical part of the stair. Most hardwood flooring and laminate flooring manufacturers don't produce Stair Treads to match their products. However, there are independent companies that specialize in Stair Treads and Risers and offer them in a variety of sizes, styles and colors. These companies will come up with the size and shape plan for the corresponding floor.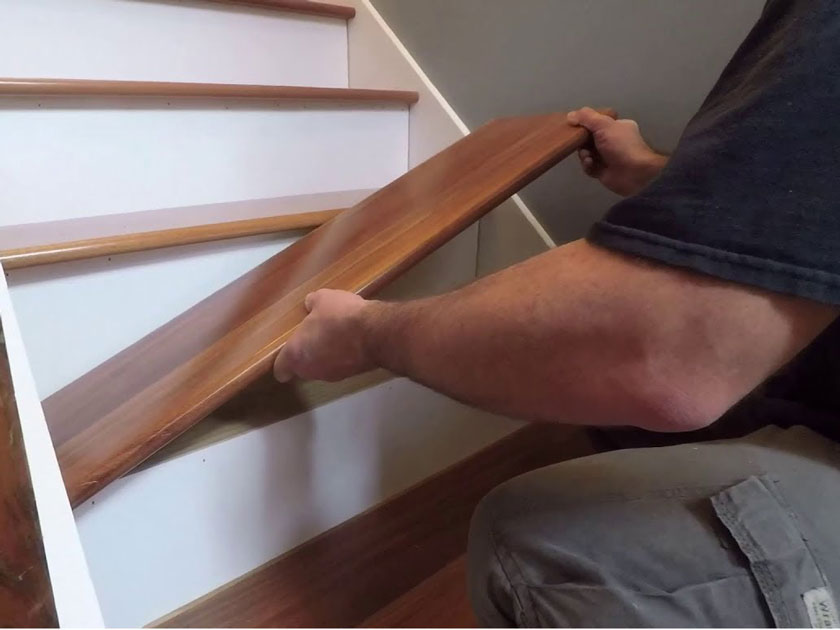
 Richard Liu
 +86.519.8585.1798 Fax:+86.519.8585.6878
 info@xinflooring.com ( 7*24 hours online)
 Science & Technology, Industrial Park, Hutang Town, Wujin District, Changzhou City, Jiangsu Province, 213162, China.