SPC (Stone Plastic Composite) - Installation
FLOATING FLOOR INSTALLATION
**RECOMMENDED METHOD OF INSTALLATION REQUIRED TOOLS AND ACCESSORIES**
* Tape Measure
* Moisture Meter (wood / concrete)
* Circular or Hand Saw
* Pull Bar
* Safety Equipment (Goggles & Mask)
* Utility Knife
* 1/4’’ Spacers
* Broom
Solid Resilient Flooring (SPC) is designed to be installed with the floating method and can be installed below grade, on grade or above grade. However the following instructions must be followed:
Important: The flooring should be installed from several cartons at the same time to insure proper color and shade mix.
* Undercut all doorjambs if necessary. Use a piece of flooring as a guide as to how much to saw. Put the floor panel faced down as a guide, saw off the bottom of the door frame to allow the floor panel to slide under it.
* Before you start with the installation, it is important to determine the layout of the flooring. Proper planning and layout will prevent having narrow plank widths at wall junctures or very short length pieces at the end of rows.
* Before starting, first measure the width of the room, and then divide the room’s width by the width of the plank. If this means that the last row of planks will be narrower than 2’’, then you will need to cut the first row of planks to make it narrower. Cut in such a way that both rows of planks (the first and last to be installed in the room) will have the same approximate width for an overall continuous look.
* Use 1/4’’ (5mm) expansion spacers to provide a gap for the seasonal expansion of the flooring along the walls of the entire room. Always place expansion spacers against the wall where the two boards meet. This will make maintaining a good square easier.
* Even if the first row of planks does not need to be trimmed in width, it will be necessary to cut off the unsupported tongue so that a clean, solid edge shows towards the wall.
* Installation of the product must start from the left side to the right of the room. Begin the installation of the planks in the left hand corner of the room with the long direction parallel to the incoming sunlight source or to the longest wall of the room.
Be sure to install the first row of boards with the tongue side facing the wall. See diagram below.
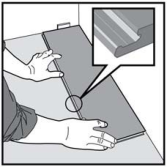
Fig 1.
First plank, first row. Place a distance 1/4” (5mm) thickness to the left and position the plank against the wall. Later, after 3 rows, you can easily position the flooring against the front wall with distances 1/4” (5mm).
Prior to installation, measure the width of the room to check if the first row should preferably be cut length wise to get more equal width of the first and last rows planks. See also fig. 10.
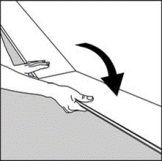
Fig 2.
Second plank, first row. Press the short end of the next floorboard at an angle to the first one, and then lay down. Complete the first row in the same way.
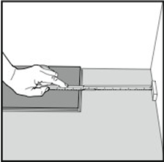
Fig 3.
At the end of the first row, put a distance 1/4” (5mm), to the wall and measure the length of the last plank to fit.
Cut the last panel to correct length, recommended min length is two times the width of the plank.

Fig 4.
Second row. Position the remaining part of the first row’s last plank as first plank of second row. Keep again two times the width as min length. Put a distance against the wall.

Fig 5.
General. Distances between short ends. Minimum distance between short ends of planks in parallel rows shall not be less than about two times the width of the plank.
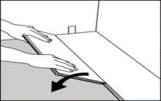
Fig 6.
Place the floorboard an angle against the floorboard in the previous row, press forward and fold down at the same time. Leave the panel in a somewhat up angled position where the panels start to lock. To make this further easier, a wedge with the suitable angle can be placed under the plank near the short side joint as support.
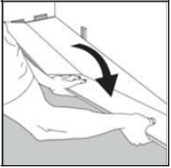
Fig 7.
Second plank second row. Place the short end of the floorboard at an angle against the previous installed floorboard and fold down all the way.
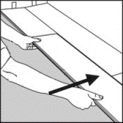
Fig 8.
Push to slide the plank against the row in front so it aligns with the first plank. Put it down like with the first plank when the floorboards are positioned tightly together. The first/previous plank can now be folded completely down to horizontal position and if a wedge is used it can be moved to the next short end joint.
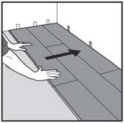
Fig 9.
After 2-3 rows. Adjust the distance to the front wall by placing distances 1/4” (5mm). Keep the distances in position during the entire time of installation and remove once the installation is completed.
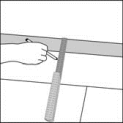
Fig 10.
If the wall is uneven, the floorboards must be adapted to its contours. Mark the floorboards with the contour of the wall. Do not forget to leave a 1/4” (5mm) space to the wall. This procedure shall be used also for the first row if necessary.
Horizontal installation
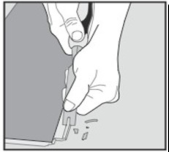
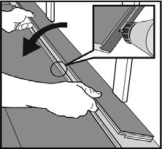
Fig 11. Fig 12.
Cut off the locking element with a chisel, apply applicable glue on the adjusted strip and push the planks horizontally together. If necessary place some spacers between last board and the wall during the hardening time of the glue. The method can also be applied to the short ends.
Radiator pipes – Principle cut out
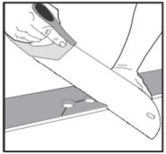
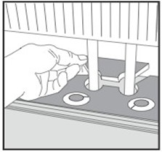
Fig 13. Fig 14.
Mark the center of the holes and drill the hole with a diameter about 16 mm bigger than the pipe diameter (= 1/4” (5mm) gap around), cut as shown with a saw or with a sharp utility knife. Install the floor plank. If necessary, put glue on the cut piece and replace.These installation specifications are for Solid Resilient Flooring (SPC). All recommendations are based on the most recent available information.
The information on this sheet provides general guidelines. All instructions and recommendations must be strictly followed for a satisfactory installation.
This SPC Floor Installation is suitable for most of click series floors, including WPC,and LVT. If you still have any problem on installation, pls feel free to contact us. We will give you professional reply at the first time.


.png?v=20250419)


 Richard Liu
 +86.519.8585.1798 Fax:+86.519.8585.6878
 info@xinflooring.com ( 7*24 hours online)
 Science & Technology, Industrial Park, Hutang Town, Wujin District, Changzhou City, Jiangsu Province, 213162, China.